
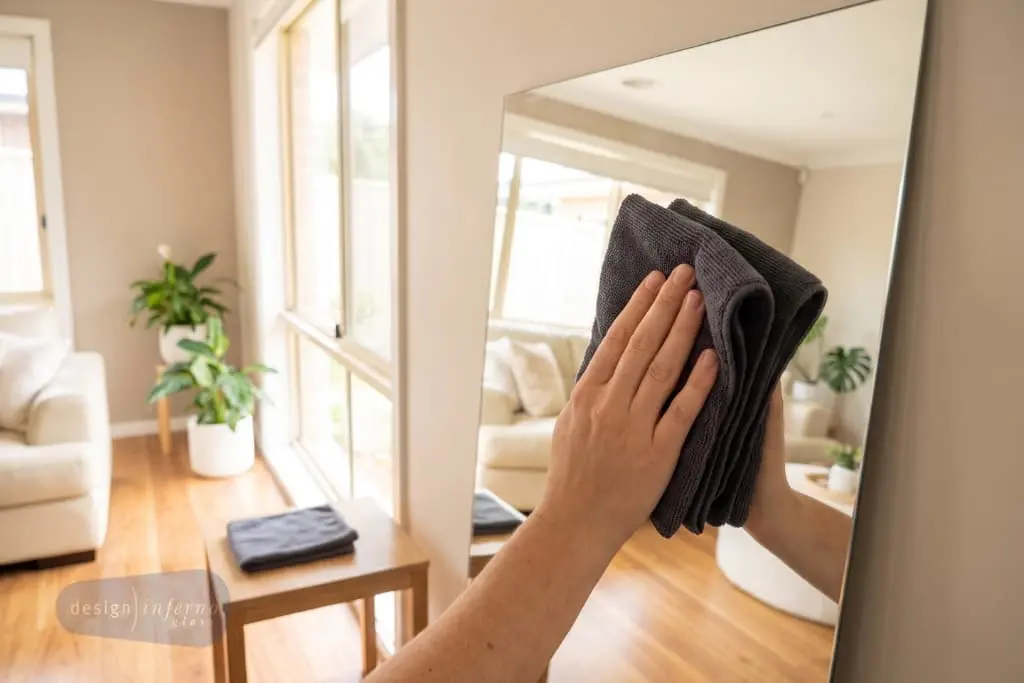
To clean a wall mirror safely, dust it dry, spray your cleaner onto a microfibre cloth rather than onto the glass, wipe from the top down in one direction, then buff dry with a second cloth. Liquid sprayed on the glass runs to the bottom edge, soaks into the backing and lifts the reflective coating. That is what causes black edges. Dry the edges every time.
Key takeaways
- Spray the cloth, never the mirror. This one habit prevents most edge damage.
- Black edges are desilvering. Once it starts, it cannot be reversed or repaired.
- Moisture is the main cause. Cleaner running down the face is the second.
- Skip ammonia, vinegar, bleach and every abrasive.
- The Australian Glass and Window Association recommends methylated spirits on a damp cloth, and warns against proprietary glass cleaners.
- Two clean microfibre cloths beat any paper towel.
- A bathroom mirror needs ventilation more than it needs cleaning.
- A chipped edge is a safety issue, not a cosmetic one. Replace it.
- Design Inferno wall mirrors start from $350, custom-made in Melbourne and professionally installed.
What is desilvering, and why does it start at the edges?
Desilvering is the breakdown of the reflective coating on the back of a mirror, seen as a black or cloudy fringe creeping in from the edge. It starts at the edge because that is the only place the coating is exposed.
What a mirror is actually made of
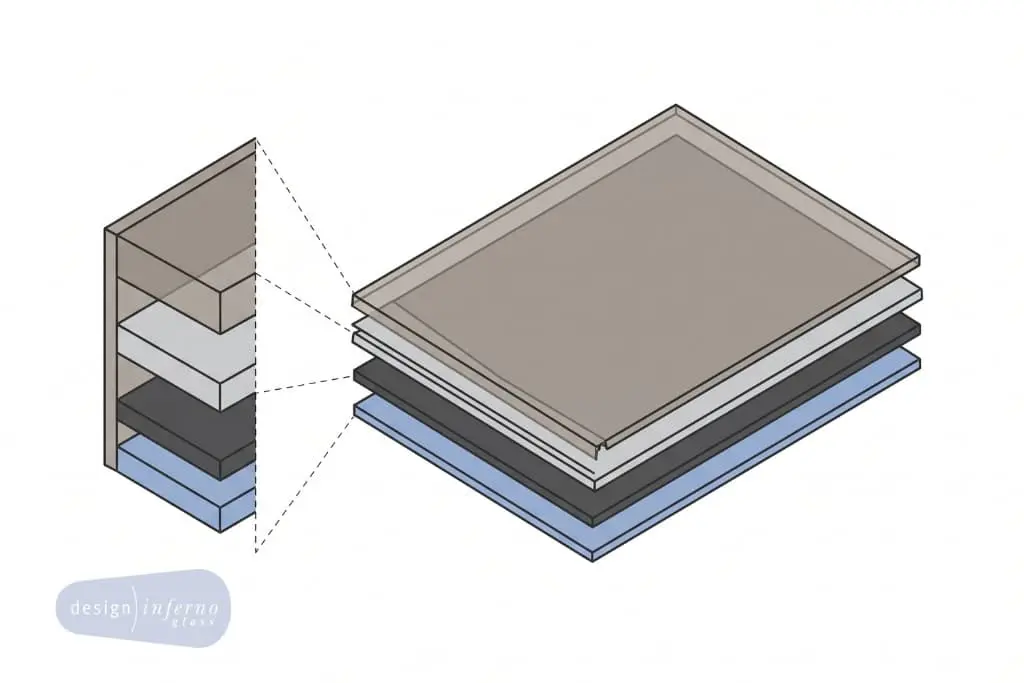
A mirror is not one material. It is a sheet of glass with a very thin reflective coating on the rear face, a second metal layer over that, and one or two coats of protective paint sealing it all in. You look through the glass at the coating. The glass protects it from the front, and the paint protects it from behind.
Nothing protects it at the four edges. There, every layer finishes flush, and that thin exposed line is the way in for water, cleaner and humid air. Once moisture gets under the coating, it travels sideways, which is why the damage always spreads inwards rather than appearing in the middle.
How to recognise it
The damage shows as a dark band along one or more edges, sometimes with a mottled grey haze behind it. People usually mistake it for dirt and clean harder. It is not on the surface at all, so cleaning does nothing. Run a fingernail over the mark. If you cannot feel it, it is behind the glass, and it is permanent.
The three things that cause almost all of it
- Cleaner sprayed onto the glass. It runs down the face, pools at the bottom edge and sits there while you finish the job.
- Steam and humidity. Bathroom mirrors take the worst of this, especially in a room that clears slowly.
- The wrong products. Ammonia, vinegar and bleach attack the coating and the sealing paint directly.
Tip: Look at the bottom edge of any mirror over about ten years old. If the damage is worse at the bottom than the top, it was cleaned with a spray bottle aimed at the glass.
What should you clean a wall mirror with?
Use two clean microfibre cloths and either methylated spirits on a damp cloth, or warm water with a single drop of dishwashing liquid. Both lift marks without reaching the backing.
The industry advice is more conservative than most people expect. The Australian Glass and Window Association’s guide to residential installation says to wipe glass with a few drops of methylated spirits on a damp cloth, then polish dry with a lint-free cloth. It goes further. It says proprietary glass cleaners are not recommended, because some can damage the silver backing on mirrors and the interlayer in laminated glass.
That is worth reading twice. The bottles sold specifically for cleaning glass are the ones the industry body warns about.
| Safe to use | Avoid completely |
|---|---|
| Methylated spirits on a damp cloth | Ammonia based glass cleaners |
| Warm water with a drop of dishwashing liquid | White vinegar and other acids |
| Isopropyl alcohol, diluted | Bleach and bathroom mould sprays |
| Two clean, dry microfibre cloths | Abrasive creams, powders and pastes |
| A soft dry brush for dust | Scourers, melamine sponges and steel wool |
| A dry cotton bud for corner marks | Paper towel and newspaper |
| A squeegee on very large mirrors | Steam cleaners |
Can you use vinegar on a mirror?
No. Vinegar is acidic, and acid attacks both the protective paint and the reflective coating wherever it reaches the exposed edge. It gets recommended constantly online because it works on windows, where there is no coating to damage. A mirror is not a window. Warm water with a drop of dishwashing liquid does the same job with none of the risk.
Is Windex or a supermarket glass cleaner safe?
Check the label before you use one. Ammonia and ammonium hydroxide are the ingredients to look for, and they are the reason the Australian Glass and Window Association warns about proprietary cleaners on mirrors. Some formulations are now ammonia-free and are much gentler. Even so, methylated spirits on a damp cloth remains the safer default, and it costs less.
What about steam cleaners and abrasives?
A steam cleaner drives hot moisture straight at the glass and, more to the point, at the edges. It is the fastest way to ruin a mirror that we see. Abrasives are the other one. Scourers, powders and melamine sponges all leave fine scratches that you will only notice later, when low sun crosses the panel and lights up every one of them.
Microfibre matters as much as the liquid. It lifts dust into the weave instead of pushing it around, and it leaves no lint. Wash your mirror cloths separately and without fabric softener, because softener residue is a common cause of streaks that no amount of buffing will fix.
Tip: Test any new product on a lower corner and wait a day. Most damage takes hours to appear, so a quick wipe test tells you nothing.
How to clean a wall mirror in five steps
Dust dry, spray the cloth, wipe top to bottom, buff with a second dry cloth, then dry the edges and the frame. The whole routine takes about five minutes.
- Dust the mirror dry first. Run a clean dry microfibre cloth over the whole face before any liquid touches it. Dust and grit are abrasive, and a wet cloth drags them across the glass.
- Spray the cleaner onto the cloth. Never onto the mirror. Two or three light sprays on a folded cloth cover a large panel. The cloth should be damp, not wet.
- Wipe from the top down in one direction. Start at the top left, work across, then down, overlapping each pass. One direction lifts marks off. Circles just move them around.
- Buff dry with a second clean cloth. This is the step that decides whether you get streaks. Follow the damp cloth immediately, using the same pattern. Never let a mirror air dry.
- Dry the edges, the frame and the surface below. Run the dry cloth along all four edges and into the corners. Any liquid left at the bottom edge is the start of the problem this routine exists to avoid.

What is your mirror trying to tell you?
Most mirror problems fall into six patterns, and each one points to a different cause. Work out which you have before you reach for a cleaner, because two of the six cannot be cleaned at all.
| What you see | What it means | What to do |
|---|---|---|
| Streaks after cleaning | Too much liquid, air drying, or softener residue in the cloth | Buff dry immediately with a second clean cloth |
| A dark band along one edge | Desilvering from moisture at the exposed edge | Cannot be cleaned. Frame over it or replace the panel |
| Cloudy haze you cannot wipe off | The coating is breaking down from behind | Cannot be cleaned. Replace the panel |
| Small clear spots that keep returning | Hard water splashes drying on the glass | Dry the panel after use, wipe with distilled water |
| Fine scratches that catch the light | Abrasive cleaning, or grit dragged by a wet cloth | Permanent. Change the cleaning method |
| Fogging that lingers after a shower | The room is not clearing, so the edges stay wet | Improve ventilation, or fit a demisting mirror |
The two that cannot be cleaned are worth naming again. A dark edge and a cloudy haze are both damage behind the glass. No product on any shelf reaches them.
How do you remove specific marks?
Most marks come off with a damp microfibre cloth and patience, and the stubborn ones need a solvent on the cloth rather than a harder scrub. Scrubbing is what scratches glass.
| Mark | What works | What to avoid |
|---|---|---|
| Hairspray and deodorant overspray | Methylated spirits or isopropyl alcohol on a cloth | Acetone, which can damage a frame finish |
| Toothpaste splatter | Warm water on a cloth, left to soften for a minute | Scraping it off dry |
| Hard water spots and limescale | A cloth dampened with distilled water, repeated | Vinegar, limescale removers, acid cleaners |
| Grease and cooking film | A drop of dishwashing liquid in warm water | Degreasers and oven cleaner |
| Permanent marker | Isopropyl alcohol on a cotton bud, working inwards | Rubbing over a wide area |
| Paint spots or adhesive | A plastic scraper at a low angle, on glass only | Metal blades, and anything near the edges |
| Fingerprints and general haze | The standard five-step routine | More product, which is rarely the answer |
Two rules cover the exceptions. Work from the centre outwards, so nothing is pushed towards an edge. And use the smallest tool that reaches the mark, because a cotton bud on one spot beats a full wipe down every time.
Hard water deserves a note in Melbourne. Water here is soft by Australian standards, so heavy limescale on a mirror usually means splashes were left to dry rather than a water quality problem. Wiping the panel dry after a shower solves it at the source.
You can see custom mirror work we have installed across Melbourne homes in the gallery.
How do you stop the edges failing in the first place?
Keep liquid off the edges, keep humid air moving, and make sure the mirror was fitted with a clear air gap behind it. Those three things decide how long the backing lasts.
The air gap nobody mentions
A mirror bonded flat against a wall, or sealed all the way around with silicone, has nowhere for moisture to escape. It condenses behind the panel and works into the backing from the rear. A correctly installed mirror sits on clips, or on the right adhesive with spacers, so air can move behind it.
Adhesive is not interchangeable
Some general-purpose construction adhesives contain solvents that attack the protective paint on the back of a mirror. The result appears months later as a blotchy patch, in exactly the shape of the adhesive bead. Only mirror-rated adhesive should ever go behind a mirror. If a mirror was fitted by someone else and you are unsure what was used, that is a fair question to ask them.
Ventilation beats cleaning
In a bathroom, ventilation does more for a mirror than any cleaning routine. Run the exhaust fan during every shower and for at least ten minutes afterwards. Open a window when the weather allows. If the mirror fogs and stays fogged for twenty minutes, the room is not clearing fast enough, and the edges are paying for it.
Four habits that add years to a mirror:
- Wipe splashes off straight away. Toothpaste, soap and hairspray hold moisture against the glass.
- Never let water pool on the shelf below. A wet vanity keeps the bottom edge wet too.
- Keep cleaning products out of the frame joint. On a framed mirror, liquid wicks into that gap and stays there.
- Do not hang anything over the top edge. Damp towels are the usual culprit, and the top edge is just as vulnerable as the bottom.
Does the care change by mirror type?
Every mirror uses the same five-step routine, but each type has one extra thing to watch. The differences are at the edges and the fittings, not on the glass.
| Mirror type | The one thing to watch | Cleaning frequency |
|---|---|---|
| Frameless | Exposed polished edge on all four sides. Dry it every time | As needed |
| Timber framed | Water swells timber and lifts the finish. Keep liquid off the frame | As needed |
| Aluminium framed | Liquid sits in the joint between frame and glass | As needed |
| Bathroom vanity | Steam, hairspray and toothpaste every day | Weekly |
| LED backlit or demisting | Electrical components behind the glass. Switch off first | Weekly, barely damp cloth |
| Toughened | A chipped edge is where toughened glass eventually fails | As needed |
Frameless mirrors
The polished edge is exposed on all four sides, so drying it is not optional. They are also the easiest type to clean, because there is no frame joint for liquid to hide in. Check the clips or the adhesive line once a year for any movement.
LED and demisting mirrors
Switch the mirror off and let it cool before cleaning. Use a barely damp cloth, keep liquid well clear of the edges, and never spray near a switch or sensor. The demister pad needs no maintenance, and it works best left alone. Wiping a heated mirror is what leaves streaks on it.
Toughened mirrors
Design Inferno makes wall mirrors in toughened glass. It is far stronger than standard mirror glass and breaks into small, blunt pieces rather than shards. It cleans exactly the same way. What it will not tolerate is a chip or a scratch on the edge, because a damaged edge is where toughened glass eventually fails. Never scrape an edge, and never let a metal tool touch one.
How often should you clean each mirror?
Match the frequency to the room, not to the calendar. A bathroom mirror sees more in a week than a hallway mirror sees in a month.
| Where the mirror is | Clean the glass | Also check |
|---|---|---|
| Bathroom or ensuite | Weekly | Bottom edge dry after showers, fan running |
| Bedroom or dressing area | Fortnightly | Frame joints, fixing clips |
| Hallway or entry | Monthly | Dust on the top edge |
| Living or dining room | Monthly | Wall behind for damp |
| Home gym or studio | Weekly to fortnightly | Hand marks at height, fixings |
| Commercial or retail fit-out | Weekly | Fixings, edge condition, frame |
Add a proper look at the edges twice a year. Stand to one side, look along the bottom edge in daylight and check for a dark fringe forming. Catching it early will not reverse it, but it tells you the room or the routine needs to change before the whole panel goes.
More short answers sit on our frequently asked questions page and across the Design Inferno blog.
Five mirror cleaning myths worth ignoring
Most mirror advice online is window advice repeated. Windows have no coating to protect, which is why the same tips do real damage on a mirror.
| The myth | What is actually true |
|---|---|
| Vinegar is a safe natural cleaner | Vinegar is an acid. At the exposed edge, it attacks the coating and the sealing paint |
| Newspaper gives a streak-free finish | It sheds fibres, and the ink can mark a frame. A dry microfibre cloth is better |
| Toothpaste polishes out scratches | It is a mild abrasive. It leaves a duller patch than the scratch it removed |
| Black edges can be resealed or repaired | The coating is physically gone. Framing over it is the only cosmetic fix |
| More cleaner means a cleaner mirror | Excess liquid is the main cause of both streaks and edge damage |
When should you replace a mirror instead of cleaning it?
Replace a mirror when the damage is behind the glass or at the edge, and clean it when the damage is on the surface. Black edges are cosmetic. A chipped edge is a safety issue.
Glass selection and installation in Australian buildings is governed by AS 1288:2021, Glass in buildings, which covers human impact safety, framing and fixing methods, and how glass behaves under thermal stress. Safety glazing materials are made to AS/NZS 2208. The NCC Housing Provisions Part 8.3 require glass used in a building to be a type within the scope of AS 1288, with safety glass legibly marked and made visible.
Mirrors sit across several of those situations at home. A large mirror in a hallway where people walk, a mirror beside a shower, and a full-height mirror in a home gym are all places where someone could make contact with the glass. Toughened glass and a safety backing both matter in those spots, and it is a reasonable thing to ask a supplier about.
Replace rather than clean when you see any of these:
- A chip or crack at any edge. It will spread, and on toughened glass a damaged edge can fail without warning.
- Movement in the panel. A mirror that shifts under light pressure has a failing fixing or adhesive.
- Desilvering past the outer edge. Once the damage reaches the viewing area, the mirror is finished.
- A cloudy haze that will not clean off. This is the coating breaking down from behind.
What does a replacement wall mirror cost in Melbourne?
Wall mirrors from Design Inferno start from $350, with the size, the glass type, the frame and the installation all moving the figure. Every mirror is measured and quoted.
Size is usually the biggest line. A larger panel needs thicker glass, more careful handling and often two installers, and those costs rise faster than the area does. The specification decides the rest.
| Specification | What is available |
|---|---|
| Types | Frameless, framed, custom shapes, bathroom |
| Glass | Toughened (tempered) glass |
| Finishes | Clear, low iron (ultra clear) |
| Frame options | Timber, aluminium, custom |
| Bathroom options | LED backlighting, demisting |
| Safety | Made to Australian safety standards |
| Manufacture | Custom made in Melbourne |
| Installation | Professional installation available |
| Starting price | From $350 |
Low iron glass is worth understanding before you choose. Standard float glass carries a faint green tint, most visible at the edges and across a large panel. Low iron glass removes almost all of it, so whites read as white, and the reflection looks truer. In a bathroom or a dressing area, that is the difference people comment on.
A measure and quote takes the guesswork out of it. Book a free consultation or call the Keilor Park showroom on 03 9336 7703. We measure and install across our Melbourne service areas, and every mirror is cut at our own workshop.
Frequently asked questions
Use two cloths. Wipe with a barely damp microfibre cloth from the top down in one direction, then buff immediately with a second dry cloth using the same pattern. Streaks come from too much liquid, from letting the mirror air dry, or from a cloth carrying fabric softener residue.
No. Vinegar is acidic, and where it reaches the exposed edge, it attacks the protective paint and the reflective coating underneath. It is popular advice because it works on windows, which have no coating. Warm water with a drop of dishwashing liquid does the same job safely.
That is desilvering. Moisture or a cleaning product has reached the reflective coating through the exposed edge and broken it down. It is most common on bathroom mirrors and on any mirror cleaned by spraying liquid straight onto the glass. It cannot be repaired.
Check the label first. Ammonia based glass cleaners are the products the Australian Glass and Window Association warns can damage the silver backing on mirrors. Some formulations are now ammonia-free and are gentler, but methylated spirits on a damp cloth remains the safer choice.
Clean it weekly with a damp microfibre cloth and buff dry, then dry the bottom edge and the vanity beneath it. Ventilation matters more than the cleaning. Run the exhaust fan during every shower and for ten minutes afterwards so the room clears.
No. The reflective coating has physically broken down, and nothing restores it. Fitting a frame or trim over a narrow fringe is a reasonable cosmetic fix. Once the damage reaches the viewing area, replacement is the only real answer.
Work in sections from a stable step platform rather than a chair. On a very large panel, use a squeegee with a damp microfibre pad. Keep the liquid on the pad, pull the squeegee in overlapping downward strokes, and dry the blade between passes so it does not drip onto the edge.
Switch it off and let it cool first. Use a barely damp microfibre cloth, keep liquid well away from the edges and any switch or sensor, and never spray near the unit. Buff dry straight after. The demister pad itself needs no maintenance.
The mirror itself needs no sealing. What needs checking is the installation: the fixings or adhesive line, the air gap behind the panel, and the condition of the four edges. A look twice a year is enough for a mirror in a normal room.
A well-made mirror in a dry, ventilated room will outlast most of the fittings around it. In a poorly ventilated bathroom, or one cleaned with the wrong products, edge damage can show inside ten years. The environment and the cleaning routine decide it, not the mirror.
